My New Backpack

Speaking of stuff, my kids were in complete shock this past spring when I bought a small purse from the local thrift store.  You see, I already had a purse, so why would I need another one?

I’m sure most women reading this would not need an explanation, but in case there is any confusion, my purse is a very colorful pattern, and it just didn’t go with several outfits.  Practical Me, for years, has always stuck with plain materials for my pocketbooks, but in recent years I have thrown caution to the wind and added some pizzazz.

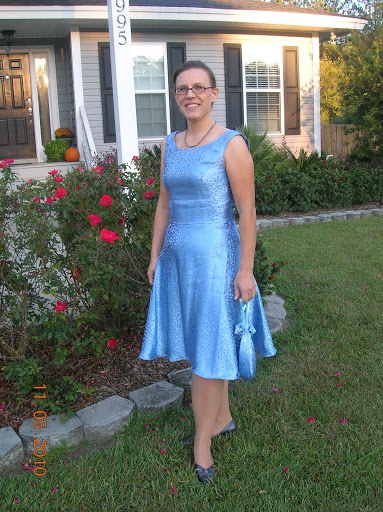
Of course, I tend to wear solid shirts and pants, so a loud purse wasn’t a big deal.  Then, Impractical Me started adding pattern dresses and shirts into my repertoire.  I know, crazy.  Symptomatic of a mid-life crisis.

Plus, my regular purse was large, and sometimes I only wanted to carry a few things.  It seems silly to carry a big purse when inside is a wallet, some lip balm, keys and a cell phone.

Then my sister and I went down to St. Augustine and I lugged my camera everywhere.  My camera is not light.  It does fit in my purse, but when traveling I tend to carry around more than a wallet and lip balm, so it was pretty full.  I decided that what I really needed was a backpack.  We shopped.  I looked.  I concluded that backpacks for women come in two types: inexpensive but ugly or attractive but way more than I was willing to spend.

Keep in mind that the last purse I bought myself was found at a thrift store.

Then I found this backpack pattern online.  For free.  All it cost me was time.  Well, not exactly true.  I had to buy super-stiff interfacing and batting.  But I bought no fabric or thread for this project, and I had a coupon for the other supplies.  Sewing did take up the better part of the weekend, but I love the results.  It was my first real quilting project.  And it uses a recycled uniform.

The flag hides where I stitched velcro to hold the flap closed.  I may change that to a magnetic clasp at some point.  No rush.  The velcro came off a uniform pant pocket.

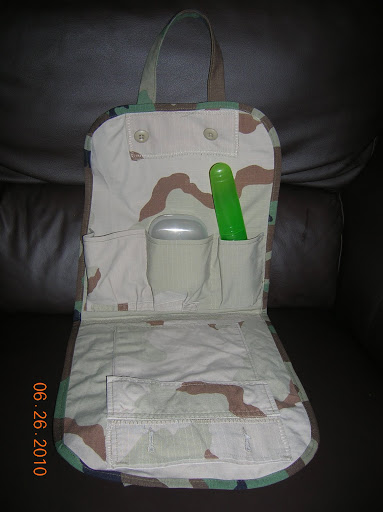
The straps are made from the collars of two uniform blouses.  They were the perfect length.

I was especially excited to use velcro closure pockets from the legs of the pants for the lining.  The big ones on the front and back are designed to hold knee pads (in the uniform – not my backpack).  One side pocket is the perfect size to hold sunglasses (in my backpack – and on the uniform).

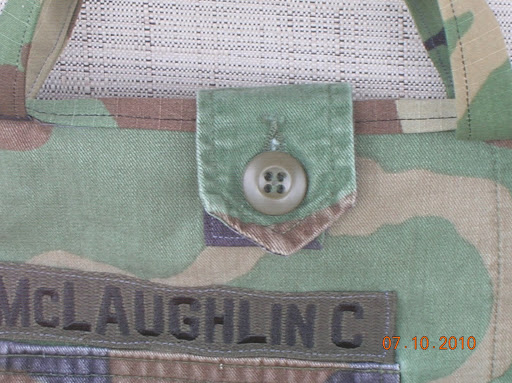
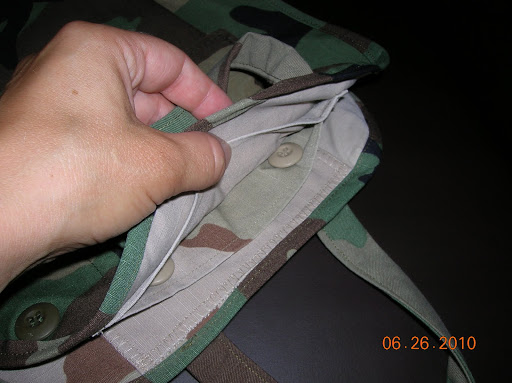
I used the back panel of the pants to make the flap.  I included the back pocket which has a button closure.  It’s a typical back pants pocket so it’s a good size.  I think the top of the backpack is the perfect place to store keys and a cell phone.  This flap was probably the second most tedious job to do.  I had to pull the pocket aside to do the quilting, then make a slit in the backing to tuck the pocket under the quilting so the pocket wasn’t quilted shut.  Then I added some faux-quilting to the top part of the pocket.  The stitches aren’t perfectly aligned, but it wasn’t an easy job to do!  I’m satisfied, and I know that 85% of the world will never notice.  And the other 15% who do will know that it’s not perfect because I made it myself.

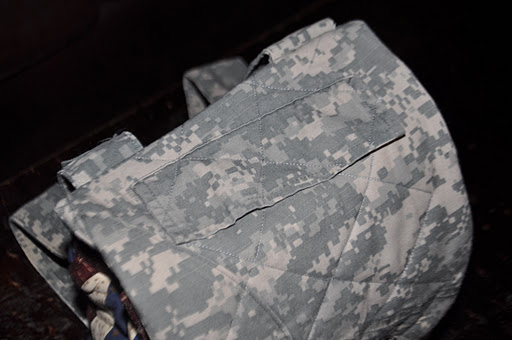
The last detail is this extra fabric, unaligned-to-anything stitch running in an arc on the side.  What is it doing there?  Well, that’s the way the pants are made.  That fabric is where the seat of the pants begins to curve around (this would have been the right back pocket).  My husband asked me if I was going to remove the fabric.  I could have, but then it wouldn’t have this quirky extra-fabric-unaligned-stitching-unique-to-my-bag-because-it’s-made-from-a- real-uniform look.

It’s art, I told him.  I also told him if I hadn’t wanted that stitch there I could have just used the ACU fabric I bought in a bolt that’s still lying around my house.

As I sewed this weekend, I vaguely paid attention to the hours it took me and I decided that if I were to make this for someone else I wouldn’t do it for less than $80.  It just took that much time.  I’d do it for me; I’d do simpler patterns for my kids (the most tedious job was the inch wide stripes that I had to sew and iron flat…if I did wider stripes, it would be easier and less work).  But I won’t be cranking these out for general sale.

But I like the results so well that I really think I’ll search the online patterns before I ever buy another purse again.

What do you think?

Clever Idea of the Day

I cleaned my closet!  It’s not 100% organized, but at least you can open and close the door.  I have more craft projects this weekend, so I’ll be in there later today getting the bins straightened out.

Fritz is camping with the Boy Scouts this weekend.

Separately, Bill and Billy are camping with the Cub Scouts as well.  They will take our 6 person tent.  A few years ago, the tent poles were left behind after a camping trip.  We went back, but they were gone.  We hoped that someone from the group (it was another Scout camp) had picked them up and would put out an email asking who had lost their poles, but it didn’t happen.  Apparently, this isn’t such an uncommon experience, because LL Bean sells replacement poles.  Replacement poles are much cheaper than a new tent. 

Unfortunately, the new poles did not come with a carrying bag like the original poles had.  Perhaps bags are also sold, but we didn’t go back and check.  We’ve just grumbled about it for years.  Of course, we don’t think about it except when we go camping.  Like this weekend.

Have I ever mentioned that I have a lot of old Army uniforms?  Or that I like to recycle them?  Or that I like to recycle any fabric whenever possible?  The blouses (the tops) have a big portion of fabric that is useful, but the pants are not as easy to use because there are so many seams.  I have made some bags for boys (“man-purses”) which have been very popular (in fact, the kids need some bags to hold piano music and I think I’ll use the pants if they are wide enough…one more project on my to-do list).

Well, not only was one leg of an Army uniform the perfect size for a bag for tent poles, the ankle has a ribbon already in to cinch it tight.  I actually already had one leg detached from a pant, so this project merely involved a 3 minute session with the sewing machine to put in an extra-strong seam along the cut edge.  The finished product:

It even has room at the bottom to store the rubber mallet my husband uses to put the plastic tent pegs in.

I have at least a dozen pairs of pants in my closet.  If you need a bag for your tent poles, let me know.  I didn’t put on a carrying strap, because I didn’t think it was really necessary (car to tent site being generally less than 10 yards), but I could add one later if I change my mind.

The Merry Wife of Suburbia (Act XLII, Scene XI)

A suburban home.  4:45 pm Friday afternoon.  The housewife sits at the dining room table while the children run amok.  Her hair is in curlers.  Her face lacks makeup.  The babysitter is due at any moment.  She is frantically pushing fabric through her sewing machine.  The doorbell rings.

Housewife: Must be the babysitter!

Daughter #1: Mom!  Some girls are here!

Housewife: (aside) Not another fundraiser… (to her daughter) What do they want?

Daughter #1: I dunno…

Son #2: (eagerly) They’re selling cupcakes.

Housewife: (aside) I am not getting up from this machine.  (sighing, to son)  Tell them they have to come in.

Enter the babysitter, a woman in her 20’s.

Housewife: Stephanie, what do they want?

Stephanie: They’re selling cupcakes.

Enter two teenaged girls.

Girl #1: We’re selling cupcakes.

Housewife: Do I have to pay you now?

Girl #2: (timidly) Yes…

Housewife: (loud sigh, shaking head)  Girls, I’m Cinderella, and I’ve got to finish this dress for the ball.

Son #2: I’ve got money, Mom!

Housewife: You want to buy cupcakes?  (He nods his head.)  Then go get your money.

Girl #1: We’ve got red velvet, vanilla……(The din of running, playing children obliterates the sound of her voice.)  What kind would you like?

Housewife: You’ll have to ask the buyer.

Phone rings.

Housewife: That’s your dad!  Somebody answer the phone!

Son #1 answers phone.  Son #2 returns with money.  He orders cupcakes.  Girls depart.  Son #1 hangs up phone.

Son #1: Dad’s on his way home.

Housewife: (rising triumphantly from her chair and shaking out the dress) Good!  And my dress is complete!

Curtain falls.

Before: skirt is floor length

The Dashing Duo

In front of my favorite rose bush

More toiletry kits

I made three more of those BEST toiletry kits EVER. The one on the left is for our friend, Connor. It is almost identical to the one I made for Fritz. The one in the middle is for Billy. I used the tan fabric for the trim and handles so the boys could know at a glance which bag belonged to whom. The bag on the right is for our friend, Emma (Connor’s sister).

I used a different closure for Connor’s bag than I did for Fritz’s. I like this closure better, but there wasn’t enough room on Billy’s kit to fit it. The uniforms I’m using are different styles and different sizes, so the pieces aren’t going to cut out consistently. It’s what makes each bag so unique.

Emma picked out a hot pink flannel fabric. I did not buy this fabric; it was pulled from leftovers from other projects (I made bags for the girls’ to carry their ballet shoes using this flannel). Again, this entire project was zero cost, which suits me very well right now. I think the hot pink looks fabulous with the green woodland camo pattern.

The BEST Toiletry Kit EVER

Fritz left today for a week at Boy Scout camp. I’m sure he will have tons of fun, especially when he works on his Rifle Shooting Merit Badge.

Previously, whenever he went camping, he used a super deluxe toiletry kit: a zip lock bag. We spare no expense in outfitting our children for their adventures.

This year, I decided to make him a real toiletry kit. I found this well-done tutorial, but of course, that’s a bit too girly for anyone with a Y chromosome. My boy needed something manly, and there’s nothing much manlier than a military uniform. And we have plenty of those.

I hate to get rid of my husband’s old uniforms. There is so much useful fabric there. And cool pockets, too. You can try to sell old uniforms at an Army/Navy store, but they don’t net you much. You can donate them to Goodwill or the Salvation Army, and I suppose a homeless man, somewhere, will be very grateful. Or you can keep them until you come up with a project that would look cool in camouflage.

Like a toiletry kit.

Here is Fritz’s kit. Not only is that a genuine BDU top, that name tape was stitched on by a real imported Korean seamstress at some Clothing and Sales store at some Army post somewhere (probably PA or NJ). Can you believe that both my husband and Fritz asked if I was going to cut off the buttons? They have no sense of artistry.

Here I have unfolded the kit so you can see both the front and back. If you are familiar with BDU tops, you will recognize the top pocket on the front and the bottom pocket on the back. Those pockets button closed and can hold a number of items securely.

This is the inside. It is made from a different camo pattern – the desert shade. The green uniform was worn by my husband in Kosovo (and various places in the US). The tan uniform was worn by one of his friends in Iraq and Afghanistan. The toiletry kit has been around the world. The friend was getting rid of his uniforms, so my husband took them, because he knows I can’t stand to throw Army uniforms away (seeing as how there is so much useful fabric there). I followed the tutorial for the tool pocket on the top side shown here, but decided to just use another uniform pocket for the other side.

To hold the kit closed, I used two buttons from the tan uniform and their button holes which I just stitched to the tan fabric before stitching the two sides together.

I’m pleased with the results, and the best reward was having my son say, “Cool!” I plan to make two more like these (one for Billy and one for my girlfriend’s son) and then 3 half camo/half girly fabric for Katie, Jenny, and my girlfriend’s daughter. I’ll be sure to post photos when I do those.

The BEST PART is that I made the whole thing without a single trip to the store. Except for the thread, which I had on hand, all components came from the uniforms (small note: I did not use any cotton batting or interfacing in this kit as the tutorial suggests, nor did I put in the zippered pocket).

I love recycling Army uniforms.

"Action" Shot

Folks, you just won’t see this everywhere. This here is a real live action shot of one of my homemade Army ACU Christmas stockings being used as decoration in Afghanistan.

No fooling. That there is a real Army issue cheap-o press board wardrobe in a real Army barracks somewhere that routinely gets mortared, but I’m not to worry about that because very rarely does anybody get hurt. Right.


(Sorry, today my husband did not give me a warm fuzzy happy safe feeling about his deployment.)

I have already sold one of these high-speed stockings and have a limited supply available for anyone with a loved one serving in the Army (sorry, other branches do not use this pattern and may take offense if you give them an Army uniform stocking).

The fabric is a rip-stop ACU pattern, just like the current Army uniform, and the loop for hanging is made from matching 550 (parachute) cord. White fluff at the top adds just the right Christmas spirit (current stock has white felt – same effect).

There are two pieces of gray Velcro on the stocking: one is large enough to hold the standard Army name tape, and the other is perfect for a unit patch. The patches shown here (not included) show “Reitemeyer” written in Dari (remember to read right to left) and the Afghani “Commando” unit patch. The Afghani Commandos are Afghani, not American, and yet “Commando” is written in English, not Dari. This is further proof that the stocking is in a real live action shot because other photos I have show official name tapes and official patches not the fun things soldiers pick up while on duty in foreign lands.

These stockings make the perfect gift for a deployed soldier. They are generously sized to fit the usual stocking stuffers. They also make a great office decoration for those soldiers on domestic duties who have offices or cubicles or lockers. I guarantee admiring and jealous comments from fellow soldiers. And if you like to give a bottle of wine/champagne as a Christmas/New Year’s gift to your favorite soldier, I just tested a stocking with a bottle of Liebfraumilch and it makes a perfect gift cover.

The stockings are $20 each plus $5 S&H for up to two stockings. Email me if you are interested. I accept Paypal. I will try my best to get them mailed quickly.

All proceeds will directly benefit the family of a deployed soldier (that would be mine).

Army ACU Stockings

It’s that time of year again. People are googling “Army Stockings” and “ACU Stockings,” and my blog comes up near the top of the search.

I actually have a stock of these (maybe 20) that I can ship out, and I do have some cut up and ready to be stitched…in my free time…

This is pretty much what they look like (patches, teddy bear and candy cane not included). I do hope to post some new pictures soon (I think the new ones are bigger), but wanted to get this post up for those women out there looking to send something to their deployed sweethearts (who else would be looking in October for Christmas stockings?).

Price: $20 each plus S&H. I have to see how many will fit in a box before I calculate postage. I will take Paypal from anyone or a personal check from someone I know.

Email me (link on the top right under my header) if you are interested.

Sewing Machine

Because my girls’ ballet studio is a bit chilly, I gave them ballet sweaters and leg warmers for Christmas. They have worn them every single day, so I guess they like their gifts.

In Katie’s class, they wear light blue leotards, so she usurped the blue skirt I made Jenny for Halloween. This did not sit well with Jenny, who wanted a pink skirt to match her pink leotard. I bought the fabric weeks ago, and hoped to make it for the 25th, but I just didn’t have time.
I also had some fabric I intended to use to make small bags specifically for the carrying of all this ballet “gear.” I’m a little tired of pink slippers on the floor of my van. This project, too, did not get underway before Christmas rolled around.
But since I’m on vacation this week (ha!), I have the leisure to partake in my favorite hobby: sewing.
First, I modified the blue skirt from a wrap style to an elastic waist style. Then I made a pink one for Jenny, using the same wrap pattern (style H), but modifying it so it is slip on.
Then I modified this pattern to make shoulder bags for the girls. Mine are fully lined and narrower than the pattern designs. I also made the straps shorter for their smaller bodies. Fortunately, the girls preferred different fabrics, so they have opposite bags with the outside of one girl’s bag being the lining of the other girl’s bag. Now I’ll know who to yell at for leaving her stuff on the floor.

It won’t be Jenny, though. She almost never stops carrying her bag. It is rather stylish.
In this picture you can (barely) see a hair net I made for the girls back in October. I made another one for Jenny to match her bag.

That was yesterday’s work. Today I’m replacing worn Velcro on two of my husband’s uniforms (a tedious job). I also hope to stitch on the proper patches to Billy’s scout uniform. It’s been 6 months, and he still has the council patch from his pack in Kansas. I think the kid deserves a squared away uniform, at least in time for the Blue and Gold Banquet in February.

C’est fini

I took my sister’s wedding dress and turned it into her daughter’s First Holy Communion dress.

It shouldn’t have been that hard, but we wanted to use the existing hemline from the adult dress with a train. The front came out all right, because there was a slight curve to the adult dress and it manged okay on the kid-sized dress. But the back panels of the kid-sized dress were made from a completely straight hem along an adult dress with a train. There was no way to force a curve. So, the middle back is longer on the Communion dress than the front. I think it will look okay – a bit like a train perhaps. I’ll take pictures when my niece wears the dress in April.

If you click on the photos, they get really big and you can see the details, like the beading I hand-stitched around the neckline…or how lousy my zipper is!

Lots and lots of prayers went into this dress. I really was unsure that I could pull it off. Definitely, all that is good about this dress is from God, and all those imperfections are mine.

What I like best is that the dress is completely recycled. Even the zipper is off the wedding dress. The only thing I had to provide was thread, which I happened to have already. So, total cost was $0.00 plus three months labor. It was worth every minute. I plan for my daughters to wear it as well, and so I was working for three dresses, not just one.

And now, if you will draw your attention to the wedding dress – or rather, if you will consider the setting of the photo, you must realize that this is my bedroom. That is a picture of General Patton on my bedroom wall. It hangs right above the valet, where my husband hangs his uniform when he’s home. I think it’s a nice juxtaposition. Also note the pictures to the left of the dress. There are eight mini-pictures of cavalry soldiers and a medium sized picture of a cavalry soldier above my dresser. On the next wall (out of view) is a pretty big print of this painting.

Fortunately, my husband is quite aware that I spoil him rotten by providing this masculine sanctuary. He is most grateful, and in return, allows me free reign in the rest of the house. I’m not a real flowery kind of person anyway.